
Setting Up and Using Your Kaleido Roaster
For new Gen 2 Sealed Roaster with Board-C (NEWER THAN SEPTEMBER 2023):
The latest version of Artisan can be downloaded here.
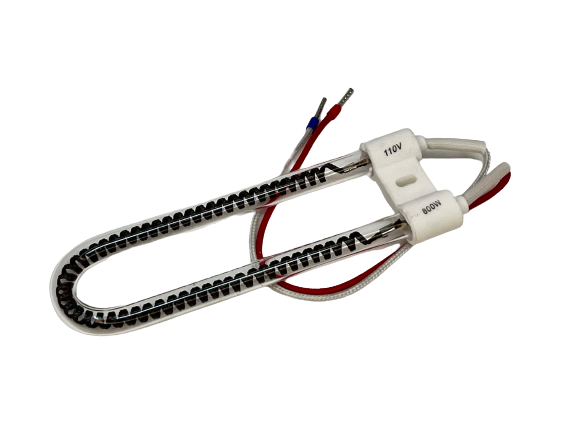
Note: All M10 will ship with the heating elements not installed in the roaster. Please follow this installation guide for heating element installation. https://kaleidoroasters.com/blogs/coffee-roasting-blog/installing-m10-heating-elements
WATCH THIS VIDEO FIRST, IT RELATES TO ALL KALEIDO SIZES AND CONNECTION TYPES. IT INCLUDES UNBOXING AND INITIAL ARTISAN SETUP. ONE THING THAT HAS CHANGED IS THE M6 AND M10 REQUIRES ELEMENT INSTALLATION NOW, SEE THE VIDEO NAMED 'HEATING ELEMENT INSTALLATION'.
NOTE: YELLOW ALLEN WRENCH DOES NOT COME WITH THE ROASTER. IF YOU WOULD LIKE AN ALLEN WRENCH, A METRIC SIZE 4 CAN BE FOUND AT HOME IMPROVEMENT STORES FOR ONLY A FEW DOLLARS.
For the Kaleido M10, the Kaleido M6, the heating elements will not come pre-installed. The following video shows how to properly install the heating elements.
The Kaleido M2 has a similar installation, but uses spring terminals instead of screw terminals. Installation is the same.
NOTE for the M6 and M10. The video below shows connecting two of the elements to the terminal block, and the third one to the circuit board. Moving forward, all three elements will be connected to the terminal block to allow for easier user installation.
![]()
The Kaleido M2 has two different main circuit board styles. The latest main board, please wire the elements per the first photo below. The control boards are identical, but have been simplified to have both sets of terminals on the control board rather than a separate terminal block.

For Legacy Kaleido M2 control boards, please wire to the terminal block per the photo below.

The Following is for the M1 LITE only. The M1 LITE ships with the cooling bin unassembled and needs to be assembled according to the video below.
Download the latest version of Artisan Software and connect to your roaster following the instructions in this video.
NOTE: We see a lot of issues with specifically MacBook Air and Artisan. This is not a Kaleido issue. We would recommend that if you have a MacBook Air that you utilize a different laptop to avoid issues. You can also troubleshoot using this guide. Trouble Connecting
NOTE: we get asked a lot about COM port questions. It is easy once explained. There should be an incoming and outgoing COM port associated with the Kaleido Roaster and Windows. On Windows platform ensure to select the OUTGOING COM port. To discover which COM port, watch the video above and start at about 1:30 mark. Also note, I have seen where windows will change these COM ports as various different devices are connected, especially with USB connection. If it is not connecting, but did yesterday, please go re-verify your outgoing COM port. For Apple, there is only one COM port. Usually will say SRS_V6 or similar.
NOTE: on the DUAL connection Kaleido roaster. Do not attempt to connect to Artisan with the tablet connected to the roaster. It might look like it is going to connect, but it will not connect properly and will not control the roaster. Please disconnect the Kaleido tablet from the roaster before connecting to Artisan via Bluetooth.
Getting started with Artisan Scope Software can be a bit intimidating. The following video is a great way to discover the main features of Artisan.
USB Drivers for Type C Boards:
Note: Do not plug the USB cord from a Dual machine into the USB port on your computer. It might damage your control board, and it does not connect to your computer through USB. The USB cord on Dual machines is reserved for the Kaleido tablet only.
Hardware Manuals for Sealed Roasters:
Frequently Asked Questions:
Q: When I connect via bluetooth, it says 'connected" and then a few second later 'disconnected'. How do I connect?
A: When you add the roaster to your bluetooth list, you are only adding to the list of approved devices. You are NOT connecting to it. Please follow instructions in video at the top of this page to set up Artisan with the correct com port, baud rate, etc. When you click the 'ON' button in Artisan, it will request connection via bluetooth.
-----------
A: Previously you needed to, but with the latest version of artisan DO NOT connect Kaleido tablet while using Artisan. It will not connect correctly and you will have issues.
-----------
Q: Do all models connect through USB?
A: Only the 'Pro' model is able to connect through USB. The 'Dual' has a USB plug, but it is reserved only for the Kaleido tablet, and might damage your control board if you plug into a computer. The Standard version does not connect to a computer.
-----------
Q: Can I download Artisan for iPad or Android tablets?A: Unfortunately Artisan is not supported on those devices. Standard Windows or Mac computers with bluetooth are recommended. We have seen people use Linux but we do not support. We have also seen a few people with very old bluetooth in very old laptops. Sometimes you will need to purchase an external bluetooth dongle for proper connection. (very rare)
-----------
Q: What is the realistic minimum and maximum amount I can roast in the Kaleido Roasters?Q: Can I buy the 'Pro' version now, and if I decide I want the Kaleido tablet in the future, can I purchase separately?
A: No, the control boards for the 'Pro' and 'Dual' are different. Please make careful consideration prior to purchase. A 'Pro' version is not able to connect to a Kaleido tablet.
_______________________________________________
Kaleido Roasters USA Social Media Support:

Follow us on Youtube at www.youtube.com/@kaleidoroasters for tutorials and the latest on roasting
We also recommend joining the very active Kaleido community on facebook at https://www.facebook.com/groups/880866703244956/
Our Instagram showcases the latest roasters and shares community photos of the roasters in use https://www.instagram.com/kaleidoroasters/
_______________________________________________
Artisan Basics:
Helpful getting started links and other content:
Recommendations for where to buy green coffee beans
How to Create Your Own Custom Artisan Profiles
Downloadable Deg C to Deg F conversion chart
Sample Artisan Background - Brazil Espresso Roast
Sample Artisan Background - Ethiopian Light Roast
Kaleido Tablet Demo Roast (same one that comes with tablet)
Starting Roasting Cheat Sheet:
When using a new roaster for the first time, we recommend using inexpensive seasoning beans to learn with. The first 2-3 batches of seasoning beans should be discarded and not consumed.
Charge Temperatures: Depending upon bean and volume, we recommend 170-180C (338-356F). Do not use Target Temp of 220C (428F) as your charge temperature. The charge temperature is the initial pre-warm up temperature that you set before adding the beans. Your target temperature will be over 200C (392F) in most cases.
(Charge temp or SV is not the same as Target Temp or drop temp).
Average roast timing, Note: this will be different for different bean origins, bean processing, and desired final development. Usually 8-10 minutes per roast plus 1-2 minutes to cool.
- 4 minutes dry phase
- 4 minutes maillard phase
- 1-2 minutes development phase
- 1-2 minutes to cool beans after dropping into cooling tray
VERY IMPORTANT: Dump you chaff drawer after every single roast, even if it does not look very full. Be careful to discard into an empty trash can or similar as sometimes the chaff can ignite after pulling from the drawer. For Natural Process, Honey Process, and various Fermented Processed green coffee beans, we recommend checking chaff drawer mid roast as many of these beans produce much-much more chaff than a washed coffee bean.
Collections
-
Kaleido Replacement Parts
Keep your Kaleido running with replacement parts from Kaleido Roasters USA. Please...
